

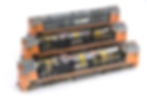
V/Line N class by Auscision Models
- Nov 15, 2025
- 3 min read
Updated: Jan 23
2025 release (21 pin plug)
Items used:
ESU 58429 LokSound 5 21-MTC decoder
Premium N class speaker by DCCSound (suits 21-MTC version model only)
Disassembly:
1) Remove the coupler assemblies, and the two screws either side of each coupler
2) Undo (about 4 mm) but don't remove two screws, located either side of the fuel tank
2) Gently lift the complete body assembly up and away from the chassis
Installation:
1) Remove the 21-MTC DC socket / board
2) Correctly orientate and install the decoder. The white ESU sticker should face down once installed (NEM660 compact).
3) Remove the factory speaker enclosure (it may be glued in place) and fit the DCCSound premium speaker, soldering the two speaker wires to the speaker solder pads at the decoder, or via the 2 pin connector on the Auscision motherboard (SPK).
Important: If the speaker is directly wired to the decoder, ensure the two pin plug at the spkr connection on the Auscision board is removed from it's socket. The decoder is not warrantied if the plug remains connected.
4) Guide the red and black bogie wires either side of the speaker and seat them in the side grooves. Then tape the speaker in place.
Reassembly:
1) Plug the main loom from the body into the "DCC" socket on the Auscision motherboard.
2) If converting a DC model to DCC, swap the two ditch light plugs from the "DC" socket to the "DCC" socket on the Auscision motherboard.
3) Refit the body to the chassis, ensuring wires don't get caught in the way or pinched by the two long screws into the centre hood section.
Finally, refit all screws and coupler assemblies.

2011 release (8 pin plug)
Items used:
ESU 58420 LokSound 5 8 pin decoder
Twin driver N class speaker by DCCSound
ESU 54671 Powerpack Mini
Centre hood removal:
1) Undo two screws, one either side of the fuel tank and back each one off by about 4mm, or until they are free from the part they screw into. There’s no need to remove them completely from the chassis. These screws hold the centre hood section down onto the chassis and walkways.
2) Gently, lever the hood section up. With a bit of wriggling and persuasion it should let go from the walkway. It may be glued in position, so be patient.
3) Once the centre hood is removed, remove the motherboard. Snip off the motherboard mounts from the plastic motor top plate.
4) Attach the decoder to the motor top plate with double sided tape.
Important: orientate the decoder so the 8 pin harness is at the # 2 end. This means Aux 1 & 2 wires point to the # 2 end, Aux & 4 wires point to the # 1 end. The battery box is at the # 1 end for reference.
5) Solder the following decoder wires:
Grey wire to top motor tab
Orange wire to bottom motor tab
6) Reinstall motor and motor top plate via 4 screws
7) Install the speaker, then wire the two brown speaker wires from the decoder to the speaker. The speaker drivers should be wired in parallel with one another and in phase. Note: avoid the centre hood screw as it may come close to one speaker wire during reassembly of the hood to chassis.
8) Wiring:
Red decoder wire to right rail wires
Black decoder wire to left rail wires
Blue common decoder wire to yellow and white lighting wires
White wire (# 1 end headlight): Black -ve: # 1 end headlight
Yellow wires (# 2 end headlight): Black -ve: # 2 end headlight
Dark green wire (Aux 1): Black -ve: # 2 end white markers
Magenta wire (Aux 2): Black -ve: # 2 end red markers
Pink wire (Aux 3): Black -ve: # 1 end white markers
Light green wire (Aux 4): Black -ve: # 1 end red markers
9) Confirm the model operates on DCC and then reattach the centre hood section, taking care to avoid any damage to wires.
10) Refit the couplers and any screws previously removed.
